Last Updated / Reviewed: Oct 8th, 2021
Execution Time: ~20-30 minutes

Goal: Create an automated report for your campaigns that you can share with your clients or team.
Ideal Outcome: Your team or your client will get a report containing the latest campaign data and results to analyze ad performance .
Prerequisites or requirements: You need to have access to the Facebook Business Manager of the ad account you’re sending the report for. If you don’t have access, ask your client or your colleague to grant you access following SOP 062: Granting access to Facebook Business Manager.
Why this is important: An automated report will help you and your team analyze (and optimize) the current ad performance effectively.
Where this is done: Facebook Business and Ads Manager.
When this is done: After you have launched your campaign and have enough data on the reporting period.
Who does this: The person responsible for media buying or analytics.
- Create your report within Ads Manager
- Login to your Ads Manager account.
- Open the sidebar and click “Ads Reporting”.

- Click “Create Report”.

- Select the “Pivot Table” layout. You can change this layout any time in the future.

- Rename the report by hovering over “Untitled Report” at the top, click the “pencil” icon, and write a new report name. For example:
- “Weekly Report”
- “Ad campaign Report Summary”
- “Business_Name campaign report”

- In the “Customize Pivot Table” sidebar, select “Campaign Name” and “Ad Set Name”.

- This will give you the ad campaign data grouped by “Campaign Name” and “Ad Set Name”.

- Alternatively, you can select one or more of the groupings available.

- Next, click “Metrics” and select the metrics you’d like to see in this report.
- You can select whichever or any combination of metrics you want. A good starting point would include:
- Amount spent
- Reach
- Clicks
- CPC
- Results
- Cost per results
- Return on Ad Spend (ROAS)

- Once you’ve selected the metrics, your report will show on the left in real time.

- Update the Date for the report. If this is a weekly report, select “Last 7 days”. Otherwise, select the period you want to report.

- Save your report.

- Sharing your report
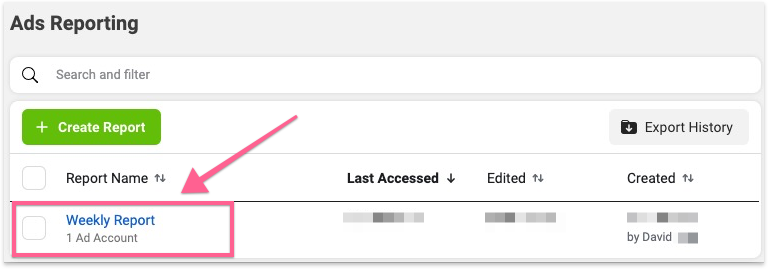
- Login to your Ads Manager reporting dashboard.
- Select the report that you want to share.

- In the top right corner, click “Share”.

- You can copy the report link and manually share with others via email or other communication channel.

- If you want to schedule the report instead, toggle “Share with others”. And select the date which you want the report to be sent.

- Scheduling an Automated Report
- Login to your Ads Manager reporting dashboard.
- Select the report that you want to share.
- Click the link right below the report name.

- Toggle the “Schedule Email” button, set a delivery date, add the person’s email (client, colleagues, manager, etc) in the subscriber’s field and click “Apply”.

- Your weekly report is now scheduled!